How to Set Up and Use Multiple Monitors - A Quick Start Guide
If you're a small business owner, marketing professional, or literally any computer user seeking to optimize your workflow and boost productivity, incorporating multiple monitors into your setup can be a game-changer. Say goodbye to constantly switching between windows and welcome the power of streamlined productivity at your fingertips.
From our personal experience, using multiple monitors has been a game changer for our business. Each employee at Igniting Business uses from three to four monitors, even when using a laptop! Since we are such big believers in the impact of multiple monitors, we’ve created a quick start guide to encourage and help you configure and effectively use multiple monitors to boost your workplace productivity.
Table of Contents
- What Are Multiple Monitors and How Do They Work?
- How to Connect and Configure Multiple Monitors
- Are Multiple Monitors Worth the Investment?
What Are Multiple Monitors and How Do They Work?
 Example of a four monitor setup (3 extended + 1 duplicated)
A setup of multiple computer monitors is connected to a single computer or workstation. Instead of working with a single screen, users can extend their display area by adding additional monitors, allowing for a larger desktop space. With multiple monitors, users can have multiple windows, applications, or documents open and visible simultaneously, improving cross-referencing capabilities and overall productivity. Check out the benefits of using multiple monitors for more detail.
I personally use five monitors at my office and four monitors at my work-from-home environment. Yes, I know that may sound like overkill, but since my digital marketing and web design job requires efficiency and referencing quite a few documents and programs, this setup saves tremendous time. I actually started out with just dual monitors, and overtime continued to expand my setup.
I’ve tested quite a few different brands and models of monitors over the years including Asus, Dell, ViewSonic, LG, Lenovo, and MSI. From my 20+ years of using multiple monitors, my favorite are definitely Asus monitors due to their balance of affordability, functionality, and reliability.
How to Connect and Configure Multiple Monitors
The following are the core steps to connect a second or third monitor to your computer. Of course, these steps will vary based on your device, but these overarching principles should help you get started.
1. Check Compatibility
Before getting started, ensure that your computer and its associated video card support multiple monitors. Most modern computers and video cards will at least support dual monitors at minimum, if not triple monitors, but it's always good to double-check your system specifications.
If you need four or more monitors connected, this typically requires a more expensive video card or the use of multiple video cards within the same machine. For those more complex configurations, we recommend talking with an IT professional.
2. Gather the Required Cables
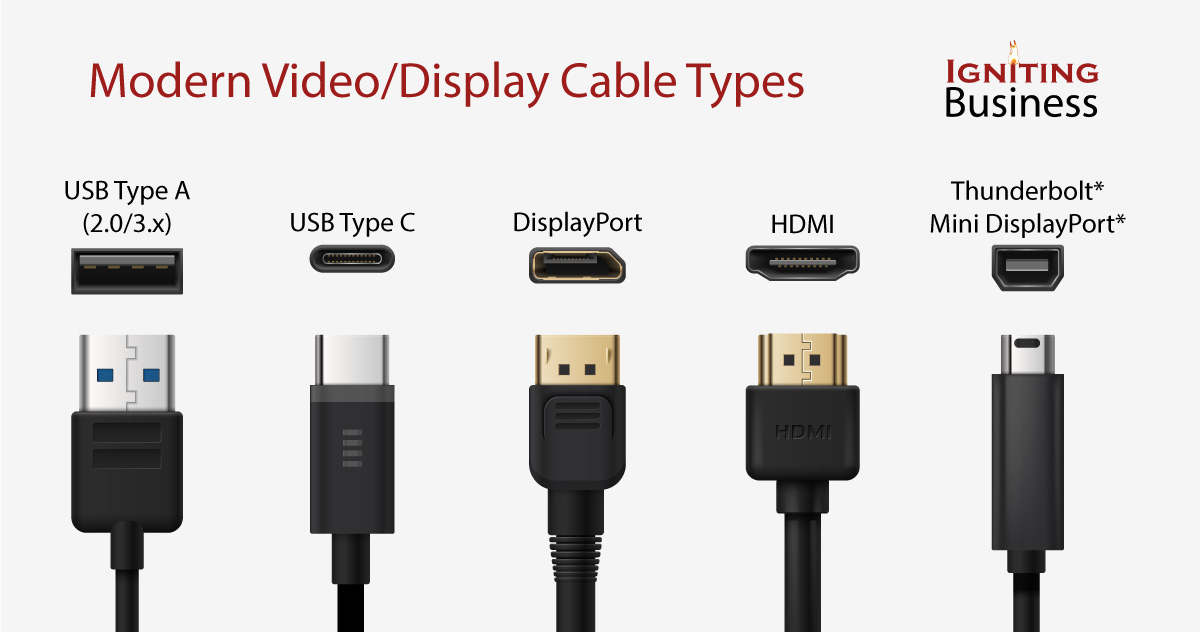
To connect multiple monitors, you'll need the appropriate cables/cords. The cables you need will depend on the ports available on both your computer and monitors. The most common, modern cables for connecting monitors are HDMI, DisplayPort, USB (Type A or Type C), Thunderbolt, or Mini DisplayPort. There are also older connector options like VGA and DVI, but we recommend using the newer ports if available as they support higher resolutions and various quality improvements over VGA and DVI.
In addition to connecting the communications cable from the computer to the monitor, you’ll also need to connect a power cable from the monitor to the power source. Typically, when you buy a new monitor, it will come with a power cable as a standard, and some may even come with a communications cable.
Keep in mind that some portable monitors, like the one I use when traveling or working outside, do not require a separate power source as they are able to get the necessary power directly from the computer.
Ensure you have the necessary cables and adapters to connect all your monitors. If you don’t have the right cables on hand, you can typically buy cables of various lengths and connectors on Amazon.com or your other favorite technology store.
Pro Tip: Since you’re connecting multiple monitors, measure the distance between your monitors and the computer tower and power source. Sometimes the cables that come with the monitors are not long enough for a multi-monitor setup. Additionally, if you have a sit-to-stand desk, make sure you get a cable that is sufficient for the maximum length needed when your desk height has been adjusted.
3. Connect the Monitors Physically
It’s safest to have your computer powered down for this step. Connect one end of the cable to the video output port on your computer and the other end to the corresponding input port on the first monitor. Repeat this process for each additional monitor, connecting them to available video output ports. Ensure the connections are secure. Additionally, ensure you have connected the appropriate power cables.
4. Turn on and Adjust Monitor Settings
Power on your computer and monitors. Most monitors will automatically detect the connected device and display the output. However, if the screens remain blank, check the input settings on each monitor to ensure they match the cable connection.
If you only see data being displayed on one screen, don’t worry, you may be able to solve that issue with step 5!
5. Adjust Windows or MacOS Settings
Once your monitors are physically connected and powered on, you will need to do initial setup to get the monitors functioning as desired. Adjusting the settings depends on your operating system (e.g. Windows vs. MacOS) and version (e.g. Windows 11 vs. Windows 10). The guidance below is fairly universal to the operating systems, but the step names and locations may vary based on the version of your operating system.
Configuring Multiple Monitors on Microsoft Windows:
- Right-click on a blank part of your desktop screen, then select "Display settings."
- You should see a graphical representation of your plugged-in monitors. Click the “Identify” button to understand which monitors correspond to the numbers shown on the screen.
- Click and drag the numbered displays to arrange them to mirror your physical setup. If you don’t do this step, your mouse may appear to illogically move from one monitor to another.
- Click on any monitor and select the drop down to select "Extend these displays" to use the monitors as one extended desktop or "Duplicate…" to mirror the same content on another monitor.
- Make additional adjustments, such as adjusting resolution, orientation, and scaling, if desired.
Configuring Multiple Monitors on MacOS:
- Head to the Apple menu, then select "System Preferences" → "Displays."
- Click on the "Arrangement" tab to view a visual representation of your monitors.
- Drag and arrange the displays according to their physical placement. If you don’t do this step, your mouse may appear to illogically move from one monitor to another.
- Check the "Mirror Displays" box if you want to duplicate the content on both monitors or leave it unchecked for extended desktop mode.
- Adjust resolution, display, brightness, and other settings as needed.
6. Optimize Monitor Physical Placement
Ensure that your monitors are positioned correctly on your desk for optimal viewing and productivity. Adjust their physical placement, angles, and heights to reduce neck strain and create a comfortable working environment.
Pro Tip: I personally prefer using monitor arms instead of the built-in monitor stands so I can get my monitors adjusted to the exact height desired to minimize eye strain and improve posture. This also allows me to custom balance non-identical monitors (e.g. different model, brand, or screen size) as desired.
7. Additional Tweaks as Needed
Over time, you may find that you want to re-arrange your monitors or make settings changes. This is totally normal and part of the process!
Also, depending on the software applications being used, some further setup might be needed within those applications to effectively use the increased screen space. Some older systems may require additional drivers or software to effectively use multiple monitors.
Please ensure you check with your system's manufacturer or consult a professional if you encounter any issues.
You’re all done! Now is the time to kick back, treat yourself, and enjoy your new multi-monitor setup!

Are Multiple Monitors Worth the Investment?
Undoubtedly, yes! Multiple monitors can significantly boost productivity by providing more screen real estate and enabling efficient multitasking. Using dual, triple, or more monitors allow you to display different applications and windows simultaneously, enhancing workflow and reducing the need for constant switching.
Get ready to transform your workspace and take your business to elevated heights of productivity.
At no additional cost to you, we may receive a commission if you click on some of the links on this website and make a purchase.
